flourless chocolate peanut butter oatmeal muffins

It’s been a while since my last muffins for Monday recipe (which included chocolate chunks, pecans, and bacon), not so much because I haven’t been making muffins, but because I haven’t been doing much blogging.

That said, today’s muffin recipe is brand new and so yummy that I just had to share!

breakfast is gonna be really good this week.....

breakfast is gonna be really good this week…..

Despite my love of all things chocolate and peanut butter, I have never combined these two ingredients in a muffin recipe before, probably because I don’t like eating dessert for breakfast.

(If you’ve tried any of my muffin recipes before, you know that they are all very lightly sweetened and a far cry from the cake-disguised-as-breakfast muffins that lots of people make. And I do enjoy eating a sweet ‘n’ fluffy muffin every now and again–just not first thing in the morning!)

This recipe is rich and flavorful, but not overly sweet, which makes it a perfect little muffin to start your day off in a hearty and (mostly) healthy direction.

I should disclose that this recipe was kind of inspired by those no-bake peanut butter chocolate oatmeal cookies that our cafeteria always used to serve for dessert when I was a kid. (Though not quite as good for you as my muffins, those cookies are darn tasty and super easy to make–here’s a recipe!)

I should also disclose that this recipe is flourless not because of any recent developments in our ability to tolerate wheat or gluten….

I just happened to be out of whole wheat flour…

So why not experiment? 🙂

What’s in it:

  • 2 cups rolled oats
  • 1/3 cup brown sugar
  • 1/4 cup unsweetened cocoa powder
  • 1/2 teaspoon salt
  • 1/2 teaspoon baking soda
  • 1 teaspoon baking powder
  • 1/2 cup peanut butter
  • 3/4 cup fat free Greek yogurt
  • 3 eggs
  • 1 teaspoon vanilla extract

Step by step:

  • Preheat your oven to 400°F and prepare a 12-cup muffin pan.
  • In a small bowl, whisk together the oats, brown sugar, baking powder, baking soda, and salt.
  • In a larger bowl, beat together the peanut butter, yogurt, eggs, and vanilla.
  • Stir the dry ingredients into the wet stuff just until everything’s incorporated.
  • Divide your batter among your 12 muffin cups. Unless you’re scared of raw eggs (I’m not), feel free to lick your spoon clean of all those deliciously chocolate-y, peanut butter-y batter remnants.
  • Bake the muffins for 15-18 minutes or until they’ve risen nicely and are firm enough to spring back a little when you press the tops.
  • Let the muffins cool in the pan for a few minutes, then remove from the pan and cool to room temperature.

I ate one of these babies as soon as it left the pan, and it was pretty special. The cocoa flavor is dark and rich, and the nuttiness of the oats nicely complements the peanut butter flavor.

I was a little worried about how the texture would turn out since I had used all oats and no flour, fearing my muffins might end up a bit fragile and crumbly, but I think the eggs and the stickiness of the peanut butter gave them enough body and structure.

Now that I’ve made tried my hand at flourless muffins, I’m excited to try some more variations, and of course I’ll try to squeeze in a blog post here and there when I do. 🙂

Categories: recipes | Tags: , , , , , , , , , , , , | 10 Comments

cured salmon (gravlax) + crispy salmon skin bacon!

One of the most amazing things we buy from Athens Locally Grown (our awesome online farmer’s market) is wild-caught Alaskan salmon.

Doug’s Wild Alaska Salmon is not technically local since Alaska is many miles away, but the business is based out of nearby South Carolina–lucky us! So Micah and I pretty much have year-round access to beautiful flash-frozen salmon fillets.

They’ve cooked up beautifully for us many times (though some of you might remember the date-night dinner disaster I detailed in one of my very first posts), but I’ve been itching to try curing and/or smoking one of these pretty pink slabs of fish to see how it would turn out.

I based my cure on Paul Hinrich’s recipe from Salon.com (which, in turn, was adapted from Professional Charcuterie by John Kinsella and David T. Harvey), but I also borrowed inspiration from Traci Des Jardins’ recipe on Chow and versions by Georgia Pellegrini and Doris and Jilly. (I figured the more recipes I read, the more I’d understand how the process works so I could figure it out on my own next time!)

What’s in it:

  • one 1-1/2 pound salmon fillet with skin but no bones
  • 6 ounces kosher salt
  • 3 ounces brown sugar
  • 1 tablespoon each black peppercorns, coriander seeds, juniper berries, and caraway seeds, coarsely ground in a spice grinder or mortar and pestle

Step-by-step:

  • In a large glass dish, mix the salt, sugar, and spices.
  • Add the salmon and cover it completely with the curing mixture.
  • Cover with plastic wrap and refrigerate for 24-36 hours or until the thickest part of the salmon is no longer squishy to the touch.
  • Rinse off the cure, pat dry the salmon, slice, and store.

(You could also include a smoking step with a DIY cold-smoker like Micah uses for his bacon, but I decided to save that for another time.)

I’ve heard this stuff will keep a few weeks in the refrigerator or a few months in the freezer…but I’ll be surprised if it lasts that long in our house!

And, as if all this delicious fishiness weren’t enough–when I was reading the Chowhound recipe, one commenter suggested frying the skin like bacon.

Y’all know how I feel about bacon.

So, of course, I had to give it a try. We cut the skin into long, skinny strips, coated a skillet with olive oil spray, and cooked the skin up on medium heat until it was nice and crispy.

Add scrambled eggs (tossed with a little goat cheese and Greek yogurt), plus capers, dill, and a pretty little pile of the salmon, and we had ourselves a gourmet brunch!

creamy eggs + tangy goat cheese + briny capers + salty salmon + crispy skin = yum!

creamy eggs + tangy goat cheese + briny capers + salty salmon + crispy skin = yum!


Categories: recipes | Tags: , , , , , , , , | 7 Comments

Happy New Year!

I know it’s been a while, and a food blogging comeback isn’t necessarily in my list of New Year’s resolutions (though I do hope to keep up a little better in 2013)….but Micah and I just enjoyed a fabulous New Year’s feast that I absolutely had to share with you!

A customary meal on January 1st includes cornbread, collard greens, black-eyed peas, rice, and some sort of pork, with the idea that all of these foods will bring you good luck, wealth, and prosperity in the coming year.

Micah and I certainly would love to have a nice, lucky 2013…but y’all should also know by now that we have a hard time playing by the rules. 🙂

So, here’s what we enjoyed for our not-so-traditional New Year’s feast:

New Year's tacos!

New Year’s tacos!

Pork belly tacos on corn tortillas with black-eyed pea hummus and collard greens, plus some buttery basmati rice seasoned with smoked paprika, sweet onions, and crispy crumbled bacon.

To answer the most important question: yes, this tasted just as delicious as it looks!

I know I haven’t been around much lately and I miss you all terribly!–but I promise, we’re still cooking up a storm, and I do plan to pop into the food blogging world every now and then to see what you’re up to, too. 🙂

Here’s wishing all of you a happy, healthy, and delicious 2013!

Categories: recipes | Tags: , , , , , , , , , , , | 5 Comments

not to make excuses, but….

Dear blogging friends,

I owe you an apology.

First, because I’ve been a pretty much absent follower for the last month and a half and have very much missed reading and commenting on all of your wonderful blogs.

Second, because I’ve also barely had any time to share any delicious food with you.

It’s not that I haven’t been eating.

Of course I have.

At least two or three meals a day (except for several very hectic mornings when I forgot–yes, forgot–to eat breakfast).

But, I’ll confess…I haven’t been cooking much lately.

So, what have I been up to these last two months or so instead?

In a nutshell, this:

does this make you dizzy? ’cause I’m a little disoriented…

But also, this:

my school library blog

And this:

my 5th graders’ class blog

And this:

an educational unconference

And this:

a two-day conference about using Google Apps in schools

Plus this:

excerpt from the Red and Black’s review of our show at Flicker

And, finally, this:

band night at the Hart County Community Theatre

As you can see, I actually have been blogging. Just not about food.

And I’ve been doing all that other stuff, too, most of which has taken up a lot of time that I would otherwise have spent cooking and writing about it.

I miss you guys and hope to be back to humble feast soon!

But, in the meantime, I hope you’ll forgive me, and maybe you could even stop in to see what my kiddos have been doing in the library lately. School is taking up a lot of my time these days, but I really am loving it. 🙂

Cheers,
Tanya

Categories: musings | Tags: , , , , | 1 Comment

we are the big bad wolf (or, what we did with the pig that didn’t get away)

So, a while back, I pretty much swore to you guys that Micah and I wouldn’t be buying another pig head.

I lied.

Oops.

Here’s the thing:

Micah really, really loves curing him some pig meat.

He most recently made bacon from a pretty slab of pork belly, but one of his favorite and most frequent curing projects is guanciale, a salty and porky cured Italian hog jowl that tastes kind of like bacon on steroids.

And lately, we’ve been having trouble finding hog jowls from any of our usual sources. None in the Athens Locally Grown listings, none in the Moonshine Meats farm store.

It’s like every recently slaughtered pig within a 100-mile radius is mysteriously without cheeks.

We’re almost out of bacon, so the situation was getting urgent. Dire, even.

Micah emailed Eric at ALG, and he suggested that Micah contact Greendale Farm–who turned out to also be sold out of hog jowls.

But they did have whole heads.

So, guys, it was an accident, but yes…we did end up with another massive pig head in our refrigerator.

I’ll spare your gag reflexes and forgo the photo of the whole big ol’ head staring at you…but I do have to share the impressive amount of pantry staples one head will yield.

First, the jowls:

in about two and a half more weeks, we’ll be in hog heaven with this cheeky, streaky bacon

And here’s the rest of the haul:

look at that army of freezer jars…..

So, what exactly is all this stuff?

Well, here’s what one pig head will very generously give you:

  • about 3 to 3-1/2 pounds delicious home-cured hog jowl bacon
  • 3 gallons + 2 cups pork stock (freeze in 1- to 2-cup portions for easy additions to soups, stews, and sauces)
  • 1 cup lard (makes a great cooking fat, especially for brunch and Southern fixins)
  • about 1 pound pig skin trimmings (perfect for seasoning beans, greens, and soups)
  • about 2 pounds pulled pork meat (which we used to make some fantastic barbecue sandwiches)
  • 1 pork tongue (I have no idea what Micah plans to do with this, but it’s in our freezer…I’ll keep you posted!)

Micah spent pretty much a whole day prepping all this stuff, but now we’ve got a freezer and refrigerator full of delicious pork products that cost us next to nothing.

Was it worth it?

Yep, I do believe it was.

And, because I’m sure some of you are wondering:

No, we did NOT make any headcheese with this hog head. We picked the meat off of the skull, but we left all that weird cartilaginous stuff out of our harvest.

I swear, we’ll never make headcheese again.

Okay, so maybe I shouldn’t swear. I haven’t been too good at keeping promises lately. 🙂

Categories: musings, recipes | Tags: , , , , , , , , , , | Leave a comment

a perfect 30th birthday, and a perfect field pea soup

I love a good birthday cake, especially the carrot cake we got from Big City Bread for my 30th birthday party a couple of weeks ago:

thanks to Micah’s mom for the candles and to my friend Alice for the lovely photo!

The folks at Big City were super nice, by the way, and offered to let me sample several tasty cakes before picking one. But when they sliced me off that first little sliver of this cream-cheese-and-carrot decadence, that was all the convincing I needed.

I received some very thoughtful presents, too.

The best gift, of course, was a fantastic gathering of friends and family at our house for my birthday party, complete with food and booze and some cheesy 80s music to commemorate the decade of my birth.

From my sweet, sweet husband: a clean house, two four-packs of my very favorite fancy beers (Wild Heaven Invocation and Ode to Mercy), lots of yummy birthday pizza from Transmetropolitan (including the best combo ever, bacon + artichoke hearts), and a classy date at Five and Ten the night after my birthday.

Money from the folks (always appreciated), a lovely bottle of Malbec from Dave and Kim, hand-drawn pictures and a birthday card from my niece Lilly, and a gift certificate to Avid Bookshop (yay!) from her uncle Jason.

From Eric and Jinny, a bottle of chamomile grappa (perfect for sipping after a swanky date-night dinner), and from my good friend Amy, a very pretty tea set with a mint-green teapot, two mugs, and packages of green tea and cookies.

Scratch-off lottery tickets (not winners–oh well!) and cute sticky notes from some school pals, plus a pretty handmade necklace from my fourth grade Froggy Friend!

I’ve got a pretty dang sweet crew of friends and family, if I do say so myself! What a perfect birthday.

So imagine my surprise when I returned to school the following Monday to find one more present waiting for me on my desk, a pink gift bag from my friend Leigh, with a note that read: “I’ve picked some field peas from my garden (purple-hull/crowder). If anyone knows what to do with these, it’s you! :)”

My birthday had already been wonderful, which made these pretty peas the proverbial icing on the cake:

I don’t mean to brag, y’all, but I think this is one of my favorite photos I’ve ever taken, ever

I spent last Saturday morning sipping coffee, baking muffins, and shelling those pretty little peas:

they’re lovely without their shells, too

Then it was time to come up with a recipe. I winged it, as usual, having never made soup with fresh field peas before, and let me tell you guys–the results were nothing short of spectacular.

not the prettiest photo I’ve ever posted, but I think you still might be able to tell that this soup was
packed with veggies, full of flavor, and perfect with a hunk of toasted homemade sourdough

What’s in it:

  • 1/2 cup diced bacon
  • 3 cloves garlic, minced
  • 1 medium red onion, chopped (about 1 cup)
  • 2 medium carrots, sliced (about 1 cup)
  • 6-8 big cabbage leaves, chopped (about 2 cups)
  • 1 cup freshly shelled field peas
  • 1 teaspoon dried marjoram
  • 1 teaspoon paprika (smoked, if you have it)
  • zest of 1 lemon
  • 3-4 cups stock or broth (I used pork)
  • 1 teaspoon sherry vinegar
  • 4 bay leaves
  • salt and pepper to taste

Step-by-step:

  • Heat the bacon in a big saucepan over medium heat and cook until it starts to crisp and the fat has rendered out.
  • Add the garlic, onion, and carrots, and saute for about 5 minutes or until they start to get tender.
  • Stir in the cabbage, field peas, marjoram, paprika, and lemon zest. Mix until everything’s coated with the bacon fat and seasonings. (At this point, things are going to smell really, really good.)
  • Pour in the stock or broth, add the vinegar and bay leaves, and bring the soup to a boil, then reduce the heat to low.
  • Simmer for 20-30 minutes or until until the peas are cooked through and the veggies are falling-apart tender.

This hearty soup makes a meal for 2 or 3 with sourdough toast, buttermilk biscuits, or hunks of warm homemade cornbread.

Make the portions a little smaller and you’ll have the perfect starter for a Southern-style feast of summer veggies and crispy fried chicken.

And when you slurp up your first spoonful of this savory soup, you’ll swear it must be your birthday (even if it’s not).

Categories: recipes | Tags: , , , , , , , , , , , | 3 Comments

taco night! (and what we did with the leftovers)

Consider, if you will, the following Venn diagram:

milk does NOT go with tacos…..sorry, Mom….

Okay, so I’ve pretty much always liked tacos.

I remember getting really, really, I’m-almost-embarrassed-to-admit-it excited about trips to Taco Bell when I was in middle and high school. That stuff is like crack for teenagers.

Mexican restaurants? Like, the kind with free chips and salsa? Poor-college-kid paradise.

But let me tell you guys, the last couple of years have been a slow, delicious taco revelation.

So, without further ado, let me present to you a list.

Ahem.

Stuff I know now that I didn’t know in my Old El Paso days:

1. You can make your own tortillas.

Scratch that.

You must make your own tortillas.

Buy a big bag of masa harina (which, I learned, is a type of corn flour that’s been nixtamalized ). Mix it with water and a little salt to make dough (there are directions on the bag), form your tortillas, and toast them in a skillet until they look kinda like this:

warm, fresh, delicious

They’re impossibly easy, especially after you’ve successfully whipped up a batch or two, and once you’ve tried these rich, savory circles of toasted corn goodness, you’ll never crave a crumbly shell from a box again.

2. Ground beef is not a necessity, despite the directions on that Old El Paso package.

Use chicken, or tofu, or shrimp, or some other ground meat like pork or turkey. For our taco dinner the other night, we used medium heat pork breakfast sausage.

Yeah, I said breakfast sausage. Sounds weird, but it’s got just a little heat and spice to it that blends perfectly with smoky cumin and a mess o’ fajita-style veggies.

Heck, you could skip the meat altogether if you like and just pile your homemade tortilla down with some deliciously seasoned vegetables, and you’d be in taco heaven.

3. Wait. Veggies?

Yes, please!

I know those Old El Paso-ans suggest that the only vegetables you need for a good taco are some shredded iceberg lettuce, a little tomato, and perhaps a black olive or three.

But we like to pack our tacos with sauteed garlic, onions, and bell peppers, some roasted poblanos, creamy avocado, and roasted tomatillo salsa verde.

Not to mention a bright, beautiful handful of freshly chopped cilantro.

Tacos kinda seem like junk food, but when they’re loaded with all these garden goodies, they might even be good for you. 🙂

4. You don’t need sour cream.

Actually, Micah and I don’t even buy sour cream. Mostly because I don’t care for it, so it never gets used up before it goes bad.

But, really, sour cream is kind of a kitchen unitasker anyway. (I don’t know anyone who just eats the stuff plain.)

So if you can substitute an ingredient that serves multiple purposes and is actually good for you, why wouldn’t you?

It’s easy: any recipe that calls for sour cream will work just fine with plain Greek yogurt instead. (And plain Greek yogurt is a perfectly normal thing to eat by itself, unlike a big bowl of sour cream.)

That’s right. If you’re really craving a little bit of creamy tang on your taco, a little dollop of plain Greek yogurt will do the trick.

*     *     *     *     *

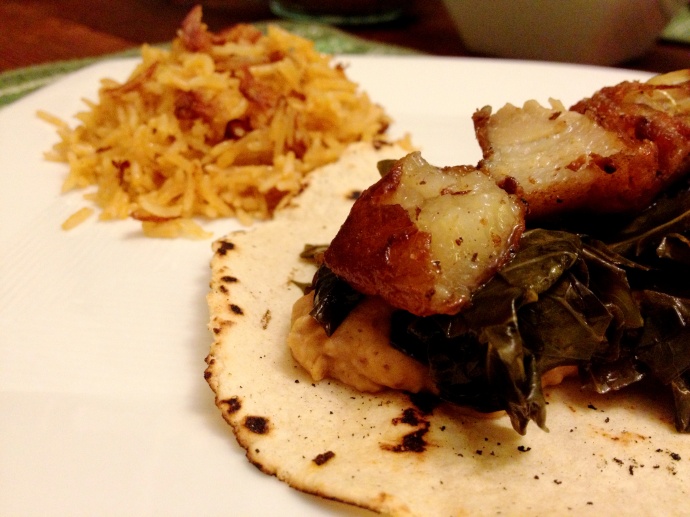
Now that I’ve shared our taco enlightenment, let me tell you about taco night.

this feast makes enough leftovers for several more taco nights, if you’re so inclined

The thing about tacos is that they’re anything but high-brow.

They’re street food, fast food, convenience food, kid food, easy food.

Tacos are what people make when they don’t feel like cooking.

But when you do feel like cooking, or when you’re whipping up a nice dinner to impress company or celebrate with friends, don’t shun the lowly taco.

If you let it, that handheld pocket of savory goodness will wow special guests, add cheer to any celebration, or even spice up a date night with your favorite person in the whole world.

What I’m suggesting here is a little more work than shells from box and a packet of seasoning mix. But it’s worth it.

This is a taco night to remember.

What’s in it (the taco filling):

  • 1 pound medium heat pork breakfast sausage
  • 2 cloves garlic, minced
  • 1/2 large onion, chopped
  • 1 large bell pepper, chopped
  • 1 medium tomato, diced
  • 1/2 teaspoon oregano
  • 2 teaspoons cumin
  • 1 teaspoon paprika (smoked is fabulous)
  • 1/8 teaspoon ground cayenne or chipotle
  • salt and pepper

Step by step:

  • Brown the sausage over medium heat in a large skillet, stirring and breaking the meat up as it cooks.
  • When the sausage is done, drain off most (but not all) of the fat. Don’t throw it away–this stuff makes a great cooking fat for scrambled eggs tomorrow!
  • Add the garlic, onion, and bell peppers to your skillet o’ sausage and cook, stirring occasionally, for about 5-8 minutes or until the veggies are tender.
  • Stir in the tomato, herbs, and spices, and cook for about 3-4 more minutes.
  • Season with salt and pepper.

Remember that roasted tomatillo salsa verde that I mentioned earlier? You can make it, too!

What’s in it (the salsa):

  • 3/4 pound fresh tomatillos, halved (or quartered, if they’re big)
  • olive oil, salt, and pepper for roasting
  • 1 avocado
  • 1/2 cup chopped cilantro
  • juice from one lime
  • 1 teaspoon cumin
  • salt, pepper, and cayenne to taste

Step by step:

  • Preheat your oven to 450°F. Line a baking sheet with parchment paper and arrange the tomatillos on it in a single layer.
  • Brush the tomatillos with olive oil, then sprinkle with salt and pepper.
  • Roast for 10-15 minutes or until they look really juicy and tender and sizzly and good.
  • Let the tomatillos cool for a few minutes, then throw them into the food processor or blender with the avocado, cilantro, lime juice, and cumin. Puree until your salsa as smooth as you like, then season with salt, pepper, and cayenne until it tastes amazing.

You’ve got taco filling and salsa…now what?

Serve those tasty fixins with:

  • homemade tortillas (this recipe is the same one that Micah and I use from DIY Delicious, and basically the same as what you’ll find on a bag of Maseca)
  • steamed rice (I seasoned mine with butter, salt, lime, and fresh cilantro)
  • black beans (Micah stewed ours in the pressure cooker with vegetable broth, chopped onion, garlic, and cumin)
  • roasted poblanos (brush with olive oil, bake at 400°F for 15-20 minutes, stick in a paper bag for 5-10 minutes, then peel, cut open, remove the seeds, and slice)
  • fresh sliced avocado
  • lots of chopped fresh cilantro
  • a little bit of grated cheese
  • lime wedges
  • Greek yogurt (or, if you must, sour cream)
  • good tequila that you can sip (not shoot) throughout the meal

And the leftovers?

That’s what omelets are for:

mmmm…….

Because taco morning is just as awesome as taco night! (Though at this point I might suggest laying off the tequila. :))

Categories: recipes | Tags: , , , , , , , , , , , , , , | 3 Comments

bacon, pecan, & chocolate chunk muffins

What do you get when you cross crispy, pan-fried, home-cured bacon with locally harvested pecans and sweet, creamy milk chocolate?

Muffins, of course!

I don’t know if you guys have missed my muffins for Monday posts, but I sure have missed making muffins!

Where have all my muffins been?

Well, here’s the thing. Since I’m a teacher, I have summers off. And during the summer, I don’t usually drag myself out of bed in time for much of a breakfast besides a big, strong cup of (possibly spiked) coffee. And Micah is perfectly happy smearing jam on some homemade whole-wheat sourdough or topping a bowl of creamy Greek yogurt with some sweet summer blueberries.

So, when I’m on vacation, the muffin recipes go on vacation, too.

But school has started back (with a vengeance–I’m crazy busy and kind of exhausted!)–so the muffins are back, too.

I wasn’t sure what yummy mix-ins I wanted to put in this week’s batch, but Micah suggested the perfect ingredient: bacon.

A quick scan of the cupboard revealed a container of pecan halves and a bar of milk chocolate.

Thus, this recipe was born.

And despite being full of bacon and chocolate, these muffins really aren’t that bad for you. Thanks to the whole wheat flour, they’ve got a little bit of fiber. Pecans, bacon, and Greek yogurt add protein. And using fat-free yogurt and no added oil or butter makes these relatively low in both fat and calories.

So I won’t feel guilty at all about devouring one of these tasty pastries for breakfast every morning this week. 🙂

a little bit o’ bacon in every bite

What’s in it:

  • 1 cup all-purpose flour
  • 1 cup whole wheat flour
  • 1/2 cup brown sugar
  • 1 teaspoon baking powder
  • 1/2 teaspoon baking soda
  • 1/2 teaspoon salt
  • 2 eggs
  • 3/4 cup fat-free Greek yogurt
  • 1/2 cup milk
  • 3 slices bacon, cooked, drained, and crumbled
  • 1 1.55 ounce milk chocolate bar, roughly chopped
  • 1/2 cup pecan halves, roughly chopped

Step-by-step:

  • Preheat your oven to 400°F and prepare a 12-cup muffin pan.
  • In a small bowl, whisk together the flours, brown sugar, baking powder, baking soda, and salt.
  • In a larger bowl, beat the eggs, then whisk in the milk and yogurt.
  • Stir the dry ingredients into the wet stuff, then fold in the bacon, chocolate, and nuts just until everything’s incorporated.
  • Divide your batter among your 12 muffin cups. If you’re not scared of raw eggs (I’m not), then feel free to lick your spoon clean of all batter remnants, which will taste just a little sweet and just a little salty (just like these muffins will be very soon).
  • Bake the muffins for 13-15 minutes or until they’re golden brown and spring back a little if you press the tops.
  • Let the muffins cool in the pan for a few minutes, then remove from the pan and cool to room temperature.

These yummy treats are fluffy and full of flavor, with just a hint of salty bacon and a touch of crunch from the chopped pecans, punctuated with little pockets of sweet, creamy chocolate.

I might add a bit more bacon next time, but these are fantastic just the way they are.

In fact, I have to tell y’all that while Micah pretty much always enjoys my muffins, he does usually prefer to slather them with a little bit of butter–but he said that this batch doesn’t need any. 🙂

Categories: recipes | Tags: , , , , , , , , , , , | 4 Comments

birthdays are better with ratatouille

I’m turning 30 on Friday, but this post is about a much more famous birthday.

All you foodie folks probably know that Julia Child, if she were still alive today, would be one of those 100-year-old ladies that Willard Scott always used to introduce on the Today show.

(Does he still do that? Is he even still on the show? I haven’t watched in a decade or two…)

What amazes me about Julia Child?

She wasn’t French, and yet she brought French cooking to America before people could just plop down at a keyboard and Google recipes for beef bourguigneon or ratatouille.

She got people excited about cooking outside their comfort zone.

And she wasn’t pretentious or snooty about French cuisine–her vision was that everyday people could use everyday ingredients to make delicious food. She was down-to-earth, funny, and so charming.

I can’t say Julia’s been a direct influence on my life as a cook, because I don’t own a copy of Mastering the Art of French Cooking (though I’ve adapted a recipe from it at least once) and honestly am not sure I’ve ever seen a full episode of her show.

But she has influenced my cooking–and your cooking and everyone else’s cooking–the same way the Beatles forever changed the face of pop music.

Rock and pop bands today, whether they enjoy the Beatles’ music or not (or, for that matter, whether they’ve ever heard of the Beatles or not) have been influenced by Fab Four. Music today is different, and better, because the Beatles existed.

And cooking nowadays is different, and better, because of Julia.

Now, the ratatouille.

Two weeks ago, I was headed to my good friend Amy’s house for a cookout. Her husband was grilling cornish hens, another friend was bringing bread, dessert was covered, and I was supposed to bring some sort of vegetable.

I had only been back from Portland for a couple of days at this point, and Micah and I had picked up a few things from Daily Groceries, but we didn’t have a lot of any one vegetable. That made it kind of hard for me to come up with any single side dish.

What did we have? Garlic, an onion, a few tomatoes. One eggplant. A huge summer squash. Three bell peppers.

Ratatouille, it turned out, was not just a practical solution for combining all those yummy summer vegetables. It was also delicious, and a natural complement to Trey’s perfectly grilled little chickens.

slow-simmered veggie goodness

Julia Child inspired the recipe I used, which was posted by Priya on her lovely blog, quête saveur. Of course, I not only multiplied the recipe by 1-1/2 for our large group, but I also made some changes. My apologies, Julia!

What did I change? I cooked the vegetables slightly out of order and all together instead of in batches to make this a super-easy one-pot dish. And I seasoned my ratatouille differently from how Julia wanted me to, because I didn’t have any parsley but did have some other stuff that seemed like it would work.

I don’t know how my results compared with Julia’s vision, but this ratatouille was darn good.

What’s in it:

  • 4 tablespoons olive oil
  • 1 medium eggplant, about 3/4 pound, peeled and diced (salt it and let it sit for ~20 minutes while you prep the other veggies)
  • 3 cloves garlic, minced
  • 1 large onion, about 3/4 pound, chopped
  • 1 large summer squash, about 3/4 pound, sliced
  • 3 bell peppers, seeded and chopped
  • 3-4 medium tomatoes, about 1-1/2 pounds, diced
  • 1/2 teaspoon lemon zest
  • 1/2 teaspoon dried thyme
  • 1/2 teaspoon dried marjoram
  • 2 teaspoons dried tarragon
  • salt and pepper to taste

Step-by-step:

  • Heat the oil in your biggest skillet over medium heat.
  • When the oil is hot, add the onions and garlic and cook for 4-5 minutes or until they start to become translucent.
  • Stir in the bell pepper and squash and saute for another 4-5 minutes.
  • Drain off any water your salted eggplant has released and add the eggplant to the pan. Cook for 5 more minutes.
  • Finally, add your tomatoes, lemon zest, and herbs.
  • At this point, your ratatouille might look a little dry, not stew-y and delicious. Don’t add water or chicken stock–just let it cook for at least 30 minutes. The vegetables will release plenty of liquid, and you’ll end up with a savory, hearty pot of stew that you can easily sop up with a warm slice of homemade bread.
  • Season to your liking with salt and pepper, and enjoy!

The best thing about ratatouille is that it can be enjoyed in so many different ways.

The night I made the ratatouille, we ate it as a side dish with those aforementioned cornish hens.

The next day, I used the leftovers as a salsa for brunch of leftover steak frites and eggs:


And I made a second batch at the end of last week, which we ate as an entree. First over some steamed brown rice (which was kind of bland) and then over polenta (oh, my goodness! highly recommended!).

The last of the ratatouille and polenta was also my lunch today, chosen over several other lunch options because, of course, I wanted to commemorate the Julia who inspired it. 🙂

Categories: people, recipes | Tags: , , , , , , , , , , , | 1 Comment

not-so-quick lunch – 6.29.12 – a tasty salad (and why I shouldn’t tempt fate)

Some foods just don’t make sense.

Some are oxymorons, like jumbo shrimp.

Others are food products that don’t exist in nature, like fat-free cheese, meatless chicken nuggets, and non-dairy creamer.

And then there are foods that flat-out laugh in the face of the laws of science: baked Alaska, fried ice cream, fried mozzarella sticks, Paula Deen’s deep-fried butter balls.

How do you heat something that’s supposed to melt–a substance that should barely survive room temperature, much less a 400-degree oven or a vat of bubbling oil–and end up with a cooked item that retains its shape like a solid rather than oozing like the liquid it rightfully should be?

I’ve never trusted myself to cook any of these nature-defying treats because, frankly, I have a hard enough time avoiding kitchen disasters when I follow recipes that do make sense.

The more I cook, the better I succeed at averting catastrophe, but some rules just weren’t meant to be broken.

At least, not by a klutz like me.

I’ve dropped entire pans of cookies on the floor; turned out many a busted Bundt cake or pan of crumbled cornbread; shredded wooden spoons with the whirring blades of my blender; burned my hands, arms, and face–yes, my face–making mashed potatoes.

Kitchens are minefields, and it’s a wonder I haven’t yet blown off my legs.

Over the years, I’ve come to terms with my kitchen clumsiness, often taking extra precautions to compensate for being accident-prone.

I make Micah pick up heavy things like Dutch ovens and cast-iron skillets.

I stand on stepstools instead of tiptoes to reach glass items on high shelves.

And I tend not to cook things like baked Alaska or fried cheese because, really, why push my luck?

So when the folks at Putney Farm shared gorgeous photos of a salad topped with golden brown and crispy baked goat cheese,

  1. I should have stopped before even reading the recipe.
  2. I should have definitely not commented on their post about how intimidated I am by science-defying baked cheeses, which only invited an encouraging reply from the friendly folk at Putney Farm.
  3. I should have absolutely not let the thought cross my mind that we happened to have goat cheese in the refrigerator and panko bread crumbs in the pantry.
  4. And, once instilled with ingredient excitement and a false sense of security, I should have without a doubt NOT attempted to bake that goat cheese myself.

Especially while also juggling a salad spinner full of greens, a pile of tomatoes and pickled beets to slice, a vinaigrette to whisk, a cast-iron skillet of bacon to crisp and pecans to toast and peaches to roast.

But I did read the recipe, did comment on it, did receive warm encouragement, did scan the contents of my kitchen for the needed ingredients, did bake my own goat cheese in the midst of all my other salad prep.

I tempted fate.

And when you test the kitchen gods, you’d better be prepared to deal with the consequence.

The consequence should’ve been a golden brown and crispy disc of firm but gooey cheese, solid enough to pick up and place atop my crisp, cool salad, but baked just enough to ooze creamy goodness into every green bite. A delicious trophy rewarding my culinary bravery.

Instead, my consequence was a searing hot baking sheet flowing with a lava-like lake of breadcrumb-speckled, melted, messy goat cheese.

My cheese didn’t defy the laws of science.

It followed them precisely.

Not pretty.

But damn it, I wanted goat cheese on my salad, and I hadn’t endured that harrowing trial just to scrape my cheesy clustercuss into the trash.

Instead, I scraped that gooey, gloppy puddle together into two misshapen globs and slapped ’em onto our salads anyway.

It wasn’t pretty, but we ate it.

And it was good.

well, okay, the salad was pretty…but the goat cheese was not

What’s in it:

  • 4 ounces goat cheese (use something kind of firm, NOT Humboldt fog  this is where I went wrong)
  • a little bit of olive oil
  • a handful of your favorite herbs
  • 1/2 cup breadcrumbs
  • 3-4 cups salad greens
  • 2 slices bacon
  • 1/4 cup halved pecans
  • 2 small peaches, quartered
  • 1 cup cherry or grape tomatoes, halved or quartered
  • 1/4 cup pickled beets, sliced into slivers
  • a quick vinaigrette (2 teaspoons brown mustard, 2 tablespoons sherry vinegar, 4 tablespoons olive oil, salt & pepper to taste)

Step-by-step:

  • Cut or mold your goat cheese into discs. Sprinkle the discs with herbs, drizzle with olive oil, and let marinate while you preheat your oven to 400°F and line a baking sheet with parchment paper.
  • Dredge the discs of cheese in the breadcrumbs to lightly coat them on all sides, arrange them on the pan, and bake for about 6 minutes. Pray your cheese doesn’t spread like frosting all over your pan. 🙂
  • Meanwhile, heat the bacon in an oven-proof skillet over medium heat. Cook it until it’s nice and crispy, then remove the bacon to cool–but leave all that tasty bacon fat in the pan.
  • Add the pecans to the skillet and cook ’em in the bacon grease until they start to smell warm and toasty–just a few minutes–then scoop out the pecans and add the peach quarters, cut sides down.
  • By this time, your cheese should be out of the oven. That’s good, because now it’s time to put your skillet o’ peaches into that 400°F oven and roast the fruit for about 10 minutes while you assemble your salad.
  • Divide your greens between two really big plates. Artfully decorate the greens with tomatoes and beets. Crumble one slice of bacon over each salad, then sprinkle on some toasted pecans.
  • Whisk together your vinaigrette if you haven’t already, then drizzle it over the salads.
  • Top your salads with warm peaches and your (hopefully lovely) baked goat cheese crouton.

What this salad wasn’t: easy to make, stress-free, boring.

What it was: a tasty mix of hot and cold, crispy and gooey, sweet and salty, light and hearty. Delicious, and pretty perfect for a summertime lunch.

Even if it was a disaster.

you know how people turn their Christmas trees to “the good side”?
yeah, same with a sloppy mess of a baked goat cheese salad.

Categories: recipes | Tags: , , , , , , , , , , | 1 Comment

Create a free website or blog at WordPress.com.